|
|
| Author |
Message |
Steve
Location: Drury South Auckland
|
 Posted: Mon Nov 24, 2008 12:38 pm attaching a crossguard Posted: Mon Nov 24, 2008 12:38 pm attaching a crossguard |
 |
|
hi all
im having trouble making my sword, does anyone know how the crossguard was attached historically?
|
|
|
 |
Callum
Sponsor

Location: Upper Hutt
|
| Posted: Mon Nov 24, 2008 2:05 pm |
|
|
I'm not an expert but I understand that either small metal or wooden wedges were used historically. Though just the pressure of the handgrip on the pommel and crossguard alone is also sufficient to hold the cross guard firmly in place.
_________________
Callum Forbes
Order of the Boar - www.jousting.co.nz
Order of the Boar Historical Foot Combat -
www.hapkido.org.nz/upperhutt.html |
|
|
|
Freebooter
Principal Sponsor
Location: Hamilton
|
| Posted: Mon Nov 24, 2008 3:44 pm |
|
|
Steve, I'm not an expert, but I have been involved in the making of a few swords. Here is how I have been shown.
Make a chisel the same dimension as your tang. Heat the cross, and use the chisel to pierce the heated metal. Allow it to cool slowly then file the cross to fit snugly into the shoulders of the tang.
Use metal wedges to stabilise the cross, as Calllum suggests above, then attach the wooden strips for the handle to the hilt so as to help make a tight fit.
Attach the pommel and make sure the tang penetrates completely through the pommel also. Pean the tang over snugly to fix the handle together.
Under no circumstances should you weld the sword and hilts together. This will create weaknesses and can result in breakage.
Once done, wrap leather or cord about the handle and the sword should be ready. After use things will settle, and you will need to re-pean the tang.
I hope that helps.
Nic
|
|
|
|
BigMac

|
| Posted: Mon Nov 24, 2008 7:40 pm |
|
|
| Freebooter wrote: |
Attach the pommel and make sure the tang penetrates completely through the pommel also. Pean the tang over snugly to fix the handle together. |
During this step it is advisable to check to make sure you are not hammering the foiable of your blade into the log your bracing it against.  (and no it wasn't me). (and no it wasn't me).
Makes it a tad unwieldy 
Guys picking up the entire mess and swinging it like a hammer toss.
Eventually I rescued the blade with a log splitter
That was one sword which made a great long dagger/swortsword 
TTFN
Bigmac
_________________
There is a fine line between Hobby and Insanity |
|
|
|
Mabus

Location: New Plymouth
|
| Posted: Mon Nov 24, 2008 10:41 pm |
|
|
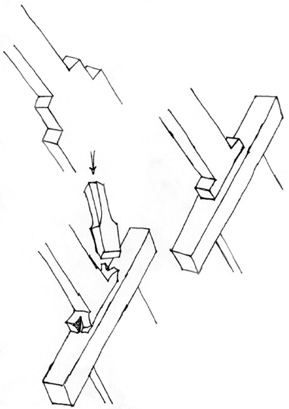
hey bud. here is a description of securing the handguard and a illustration (attachment) of the process I was talking about.
The tang is made in steps and the step extends through the tang slot in the guard. The shoulders exposed through the guard are split with a chisel and the split shoulders forced down on the guard to permanently force the guard against the base of the blade. If heat is used such as a welding torch be sure to heat gradually and allow to cool gradually. Even playing some heat on the area a bit after the splits are made. This may soften the area a bit but that is better than making it brittle by cooling the joint too fast. I hope this helps. Good luck.
| Description: |
|
| Filesize: |
26.56 KB |
| Viewed: |
12443 Time(s) |

|
| Description: |
|
| Filesize: |
26.56 KB |
| Viewed: |
12443 Time(s) |
|
|
|
|
|
Bogue
Sponsor

Location: Palmy
|
| Posted: Mon Nov 24, 2008 11:25 pm Cross guard assembly. |
|
|
Just a wee word on this topic.
On the shoulders of the blade where it curves into the tang make those internal corners slightly radiused (rounded) this will prevent square fracturable points on the weakest point of the blade. Some makers even offset the two points to further negate that. Have done it myself but requires further work on the crossguard for a smooth yet tight fit.
A drill and a couple of good files will be your best friends in making your cross guard.
What would Mr Lyon recommend
Cheers
Bogue
|
|
|
|
White Knight

Location: Orcland
|
| Posted: Mon Nov 24, 2008 11:51 pm |
|
|
Mabus I have never before seen the method of using a chisel to lock the crossguard in place. Where did you get this method from?
Not trying to put you down but I'm not sure if this method was authentic nor am I sure if it is needed? I can certainly agree with you that it would work but feel that it is an unnecessary extra.
I've made a few swords myself and agree with Nic that the pressure from the handgrip against the pommel keeps the crossguard in place.
I would recommend that a gas torch is used to heat up the end of the tang to a cherry red colour so that it is easier to peen the tang over the pommel.
If you don't have a gas torch go to either a welder or mechanics workshop and ask them to help.
_________________
Living History. Choose to be part of it. |
|
|
|
Mabus
Location: New Plymouth
|
| Posted: Tue Nov 25, 2008 7:45 pm |
|
|
Hey White Knight, you are correct. The method is not historically authentic. I can appreciate that you are into historical accuracy for reenactment and I know that this is what this steve requested; I wasn't trying to pass it off as such, although through researching and trial / error I have found that this method makes the weakest point on the sword; the junction between the blade and the tang, as strong as possible, and braces the guard as firmly in place as possible. If you want your sword to "sing" when it strikes rather than buzz or rattle this method works well.
If historical accuracy is the priority, I would hot peen the tang behind the pommel so the handle is holding the guard in place or cut a thread into the tang so the pommel can be secured with the handle holding the crossguard in place as you no doubt already know.
|
|
|
|
Peter Lyon
Location: Wellington
|
| Posted: Tue Nov 25, 2008 8:59 pm |
|
|
There are a few ways to attach the cross, some better than others.
It helps if the cross is a really snug fit on the tang and shoulders of the blade; any sideways slop can create a rattle even if the cross is pushed tight onto the shoulders of the blade.
For strength, the shoulders should be rounded and blend into the tang, to avoid stress risers (areas of concentrated stress; if it is going to fail, it will probably happen at a stress riser). In general, avoid suddenly changes in cross section.
Nic is right about chisellling a slot in the cross, but an easier way, that doesn't need a heat source, is to drill and file the hole. Drill a line of holes close together and slightly smaller than the thickness of the cross; then drill out the thin webs between the holes; and finish with a flat file until the blade just snugs tight on the shoulders of the blade. This will also work better if the thickness of the tang reduces very very slightly towards the pommel end. I also sometimes heat the cross to an orange heat and hammer it onto the shoulders of the blade to set the shoulders a good 1-2mm into the cross; this way there is no way for the cross to move when it is all assembed.
The method posted by Mabus will also work, though I have never used it myself. It will however need practise to do well; it takes a lot of heat to soften the shoulder enough to split while the cross is also acting as a heat sink, and too much heat or too long will soften the top of the blade too much. There could also be a lot of cleanu afterwards.
If the cross, grip and pommel are all held tightly together with glue and peening the tang end, there should not be a problem with rattling for a while. Though eventually blows to the cross can compress the wood at the base of the grip and a rattle can result; but this did also happen in the middle ages.
I have handled a claymore that used iron wedges to hold the cross and blade tight together, but that was because the hole in the cross was much bigger than needed (maybe the blade was German, but hilted in Scotland with a pre-made cross).
|
|
|
|
White Knight
Location: Orcland
|
| Posted: Thu Nov 27, 2008 11:30 pm |
|
|
Peter Lyon said:
| Quote: | | Though eventually blows to the cross can compress the wood at the base of the grip and a rattle can result; but this did also happen in the middle ages. |
If I were to experience this I would make a new wooden handle.
One method that has worked for me is to make the handle out of two halves, glue them to the tang and then wrap a piece of wet leather around the handle and stitch it on.
Soaking the leather allows it to stretch and when it dries it shrinks tightening its grip. Do not apply the leather if it is dripping with water.
I prefer to use 6 ply waxed linen thread when I sew leather as it is strong and won't rot .
Even if the tang has cooled right down after being heated I have found that the heat has softened the tang enough to make peening much more easier than if you were to try peening it over the pommel without heating it.
I have tried both for the comparison.
No heat = mission impossible.
If you wish to put a fuller groove into your sword by using a grinder try to work both sides equally. Doing first one side a little then the other and back again allowing the sword to cool and don't grind for too long as the heat can distort and warp the blade. Patience grasshopper.
_________________
Living History. Choose to be part of it. |
|
|
|
|


 Please read the terms of use